Monday, May 10, 2010

Herb? He's good people.

Sorry I have been gone, I am still waiting for my charger to come in the mail. Till then I am using my old laptop which I dislike very much. Uggg

As most of you know I have been working on my garden and yard. It has kept me pretty busy these last few weeks which means less time for my blog. Sorry guys! But most of the work is done and now I have more time. This year I planned my garden down on paper and did more research so I could take advantage of the tiny space I do have to the fullest. I think this year is going to be more productive year. I really want to have herbs that would beneficial to our life. I really wanted to have herbs to use for homemade tea, and also herbs we could use for ailments. I really was amazed how many herbs you can use. There are so many to share with you but I think I will just share 2 at a time. So here we go!
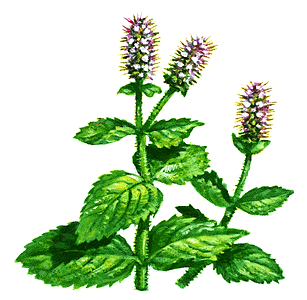
Mint
Mints are herbaceous perennials that thrive in most locations. Mint is a rampant spreader so they grow really nice in a container, flower bed, or the green space along sidewalks. Mint has beautiful tiny purple or pink blossoms in whorls on spikes along the stems.
Harvest
Just before blooming, cut the stalks and hang in bunches to dry;store in air tight containers. Leaves can be frozen or infused with oil or vinegar. I use my dehydrator to dry my mint. I simply pick new leaves and lay on the trays. Only takes an hour or so for my dehydrator to dry them. I put them into mason jars and enjoy mint tea all year round. My children love picking the leaves, squeezing them in their hands and putting the leaves into a glass of cold water. Mint water is their favorite.
Culinary Uses
Leaves can be used to accompany lamb, added to salads;used to flavor sausages, meat dishes, tomatoes and fruit salads.  Mint is an important ingredient in Middle Eastern cooking.  Also used in tea's and ice drinks.  Anytime one of my family members get a cold and cough, I make mint tea from last years crop. I add a tsp of honey and we drink it hot as possible. I think its better than any cough drop. Especially good to have a cup of hot mint tea before bedtime.
Medical Uses
Peppermint is used for indigestion, colic, colds, excess mucus and nausea.  Mint is also used to treat skin irritations, upper respiratory tract infections, minor burns, ringworm and sinusitis.  Peppermint and eau-de-cologne mint oils are used in oral hygiene preparations, antacids, toiletries, candy, chewing gum, ice cream and liqueurs.


Lemon Balm 
Lemon balm is one of my favorite herbs for a few reasons. My favorite is how aromatic it is. Last year I bought  3 inch pot starts and now they are 2 ft high. One small plant will do you for sure. This herb will need to be planted in a pot, flower bed or green space along the sidewalk. It will take over if you do not watch it.
I also am in love with how beaituful this plant is. Such a bright beautiful green and its leaves are so shiny. Love it! Summer to Autumn mint will have a two-lipped pale yellowish green through to white tubular blossoms in bunches in the leaf axils.
Harvesting and storing
Collect leaves in summer, use fresh, or dry quickly to prevent from turning black.  Their flavor is best when the flowers begin to open. Cut the entire plant leaving 2 inches of stem. Hang in bunches upside down to dry or you can use a dehydrator to dry them. Store in airtight container.
Special tip
Lemon balm is used to repel insect pest. Lemon balm in pots are a great addition to any patio to keep insects away or you can also keep potted lemon balm in your garden to keep insects from eating at your garden.
Culinary Uses
Fresh leaves with a lemon flavor can be added to salads, soups, herb vinegar, game and fish.  Add to fruit salads, custards, and fruit drinks.  Infuse fresh leaves for tea.
Medicinal Uses
For indigestion, depression, headaches, insect bites, herpes, feverish colds and gout. It is also a sedative.

My goal this year is to not use any medication if I can help it. I would love to just go all natural with any ailment we might have. With all these recalls on medicines, I honestly do not trust medicines anymore. Obviously if we have any major problems we will always call our doctor or 911. My children will also get fever medicines because I do not want them to suffer but as for myself its all natural.

My favorite thing to do with both these herbs is to use it as a air freshener. Take your herb of choice and bundle it with string. Simply squeeze it a few times which will wrinkle the leaves which will release the oils from the leaves. Then simply put in front of a fan or near a window. We have vents on the floor so I just lay a bundle on the vent. This will blow the oil scent all over your home. I love this and do it any chance I can get. 

What about you? You have any creative uses for lemon balm or mint?


Thursday, May 6, 2010

Compost info

Have you ever thought of composting? Its easier than you think promise! Assuming that you have one, I thought I would give you some idea's of what to put in your compost. I have a hard time finding browns to put in mine so I have to get creative. Maybe you are different, maybe you don't have enough greens. Here is a great list of things you can put in your compost.

Browns-Wood ashes,saw dust, tea bags, egg shells, corn cobs, shredded paper or cardboard, straw, and dried leaves.

Greens-Vegetables, fruits, grass clippings, manure, coffee grounds, seaweed, feathers, plant cuttings and hair.

DO NOT PUT IN-Meat and bones, poultry and fish, fatty food waste, whole eggs, dairy product, human and pet feces, pernicious weeds, used kitty liter, or treated wood.

I will be making another compost soon which will be followed up with pictures.  Any of you have creative compost? Ive used a garbage can with holes drilled into it and even just made a pile on the ground. I'm 

Wednesday, May 5, 2010

Project Overhaul-garden diary


This was my garden last year. The previous owner of our house built this garden bed on the side of the house. When we came to look at the house I was so thrilled to find this and all the other garden beds around the property. I think maybe because I was so excited that I over looked the fact that they were all built with treated wood. Literally I just realized  these were treated wood about 2 weeks ago. I'm still scratching my head and shocked that I never realized this fact. My focus last year was to test this garden space out to see what grows best where, where the sun was and how long it was shining on certain area's. Now I know not to plant anything along the back fence because its too shady. I really wanted a organic garden but didn't have the extra money especially because it was a test run year.

This year I plan on taking full advantage of the garden. My husband built a retaining wall (back neighbors property is higher than ours) with a drainage system so the back wall will only be used for decorative flowers and shady herbs. But the rest of the garden will be overhauled!  I tore down the treated wood and planned on tilling the garden soil so it would be easy to move where I wanted it. But....our tiller is broken. So I spent the whole weekend hand tilling the soil with just coffee and my shovel. Saturday I shoveled until I literally couldn't move. Sunday my best friend came over and helped me finish off what I started and this is what I came up with.

At first each new planting row was split in two but then it started looking like a graveyard.  Not the look I was going for so I just made one long row at a time. In the 3rd row I put our broken fountain turned into bird feeder. I really love this because it has a little girl holding an umbrella on it and its just adorable.
 Notice the organic mulch everywhere. This should help deter weeds (which love my garden area). If you remember earlier this week I scored this stuff for free and took advantage of all of it.

See that green garden bench? My husband built me that about 5 years ago and I painted it green. I just love it!

The treated wood box you see to the left will be taken down as soon as it stops raining here. This will be one long garden bed. I might split it up because my hose is located there. Still not sure how this will turn out.

Back retaining wall needs to be finished by filling the dirt in. This too will be taken care of when it stops raining.

Last year we built the green fence you see in the back left area. My dog cannot be trusted and sneaks into my garden to eat my compost any chance she can get. Urrrr! I plan on putting my arbor (came with the house) over the gate and planting some flowers or maybe some pea's to grow up the side of it.

See those barrels on the right? Those also came with the home and are on their last leg. Might have to take those apart....not sure yet. I put my tomato plants in there last year and they did okay.

Not sure if you can see but I also have some large metal garden art on the right hand side by the fence. They too came with the property and were holding up some rose bushes that I took out because they were over grown. I plan on using them along the wall on the left to grow my pea's up them. Or maybe some green beans....not sure.

That back fence that is so lovely and falling apart will be our next project. As soon as the retaining wall is completely done (garden area was done first so I could plant asap) we are building a new fence. I believe it was the original fence built when the house was built back in 1967. Long over due! We will be taking all treated wood to the dump and see how they will use or reuse it. All other wood I will hammer and pull out all the nails which should take  me a while to do. We will be using the wood for a few projects but the rest will be cut down and used for kindling.  I think next year we will be replacing the side fences....we will see.

Anyways there you have it. My weekend was spent in the garden working my butt off. Today's plan? Cleaning my house from 2 days of no chores. Should be interesting because i'm super sore!

Tuesday, May 4, 2010

Decorating on the cheap Part two

How cool is this red shelf?  When I found this shelf it was beige, super dirty and dusty. I paid $5 for this from my local Goodwill Outlet. The reason I bought it was because it was metal and had such a cool shape to it. I had no idea where it was put originally but wanted to add a cool piece to my kitchen and the red would make it pop out.  We sanded it down and spray painted it red. I stole some spray paint from my husbands garage stash of paints.  So its been in my kitchen (several houses though) ever since. One day I was looking at retro kitchen pictures and I about fell out of my chair. Early in the 50's metal kitchen cabinets were so in and this was from one of those kitchens!  How cool is that! So this shelf holds all my cooking books, reusable sandwich bags, metal tins full of beans, homemade framed art work and also things i'm saving up to do more art work with. One mason jar of corks and one full of beer caps.

Total cost for this project=$5
Total if you bought it new=Priceless because you might not ever find it!

Now this piece I can give my husband credit for. A co worker who lives down the street asked if we could use a corner shelf. My husband knows I will take almost anything for free so he said yes. One day we came home to find this piece unpainted and on our front porch. We had some left over paint from painting our house so we used that to paint it. It goes in our kitchen art room. Yes you read that right. We have a old home with a kitchen dining area and a formal dining room. We use the kitchen one for our kids art room. The art on the walls are all from our kids. I also want to mention the fact that I worked at a art store for 10 years. This is just a small portion of art supplies that we own. I have a 6 drawer dresser in this room as well that I found on the side of the road. I cleaned it up, spray painted it and it holds all the other art supplies we have.

Total for this project=FREE!!
Total you would pay for this new=$60-$100

Monday, May 3, 2010

Decorating on the cheap


A few years ago I saw these adorable clip art boards in my Pottery Barn Kids catalog and thought how easy it would be to make. My apologies for lack of color. They kind of blend into this wall since the wall color is the same as them. This will be changing soon. But back to my cool story....I went to my local hardware store and bought a wooden board for $1.50. I already had the paint so that was free. The clips I found at Fred Meyers and paid $1.50 for three.  I simply nailed the clips to the board and there you have it! Well sorta, I forgot to mention sawtooth's I already had were nailed in the back so I could hang these. But you could easily drill a hole in the back and just use a nail to hang them up.

How cool are these. You can use these for putting your children's art work or maybe even in your office. Possibilities are endless.

Total for this project=$4.50 for two.
Price Pottery Barn Kids wanted=$30 for two.
 Last year I took a trip up to Seattle Washington with my best friend. Once a year I go out with her to get away from the kids and relax.  Anytime we travel we like to bring home a little something to decorate or have as a keepsake. I really wanted some art work but was on a budget and really didn't have the extra money to get anything that cost much. It would of came out of my food budget and I didn't want to do that. I found in the Pikes Place Market a booth with lots of post cards. I ended up picking 3 of them and they were only $1 for all 3. Really didn't know what I was going to do with them but it was something to take home. Well fast forward 6 months later and I ended up getting this frame and matte for free from a relative. The frame was brown and ugly and it has some sort of hillbilly saying in it that was not going up on my walls..not gonna say who it was from.  I simply took spray paint and painted the frame black. The post cards were just black and white so I took some coloring pencils and added small touches of color in random places. A womans jacket, umbrella, and tree's to name a few. I wanted to just add a touch of color. Then I simply taped them in the center and put it back together. So here you go, a keepsake from the Seattle trip I took.

Total cost for this=$1
Art work in Seattle already done for sale=$20-$100

My point to this post is to get your minds thinking. You can decorate your home for cheap and not look cheap. If you cannot afford that oh so cool piece you want, make it yourself.  There is always a way around everything.  You just have to be creative!

Sunday, May 2, 2010

A peek into my room...You know you want to look! Part 3

A great way to save money on furniture is to use what you have. For instance this dresser on the right was my husbands and his sisters when they were little. Its was green, blue, pink and now its current color is white. This is as is and the way it was given to us. My daughters have all used this and now its living in my room. I just love the old look of this and the beautiful curves on the bottom legs. When you open the drawer it has that old sound of wood touching wood. Not the silent sliding drawers you find on new dressers.  It creaks when you move it just to remind you of how old it is. LOVE IT! Best of all it cost us nothing.

The little side table on the left is my favorite piece I acquired.  I am a thrift store rat and love hitting up any store locally and wandering around for hours. This was bought at a Goodwill outlet which means that it never sold at a regular Goodwill and was sent there to be sold for cheap. I paid a whopping $1 for it. Again its as is the way I found it.  Instead of drawer knobs it has build on handles.  Its perfect for my bedside table. Holds things I need and just the right height. LOVE IT!

See the cool red glass hand? This was bought  at a small vintage shop in Lincoln City Oregon. I think I paid $5 for it. Not sure if it was for modeling jewelry or what. I was so excited to see it matched our new bedding theme. Who puts a glass hand like this in their room? Me of course! Its weird and oh so cool!

Now for my husband he needs nothing fancy. This is a metal planter stand I bought when I was working at a local craft store. I think I paid around $3 for this because it was on clearance for 90% off. Just to show you can use things for more than one purpose.  Its white and kinds goes with the picket fence theme from my bed. It holds his clock and thats it. No fuss no muss and my husband is okay with it. Best of all we already had it in our home and I didn't have to go buy anything. We used what we already had.


This would be pretty cool next to our bed.  Not a bad price for $19.99


Can you believe I found the exact hand! Holy cow! Mine is crazy red but everything else is exactly the same. Now I know what it was used for. So cool!

Saturday, May 1, 2010

A peek into my room...You know you want to look! Part 2

Now onto our furniture. This beautiful dresser was bought new several years ago. We found it on clearance and paid maybe $150 for it which is a really good buy. I think we used our tax money for it. Our big purchase for the year! The frames were gifts from friends and family for our wedding gifts. When we did our wedding registry at Target, we asked for things we really could use. You know when you go buy a gift for a friend/family member and they ask for all these crazy things like espresso machines, ice cream makers, etc. Instead we thought about what we could use and what would come in handy years from now. My favorite is the flip picture thing on the left. This way I can change the picture showing anytime I want. One picture frame has us when we were dating. Remember those photo booths? Oh how I loved those things. Black and white small photo's of us kissing and being foolish young lovers. lol.
This massive mirror was a gift from my sister. She found this for $7 at Goodwill. Can you believe it?  This is as is the way it was given to me. LOVE IT! And its not any cheap mirror. This is a crazy thick heavy wooded frame and was made to last. It took us a bit of time to figure out what we were going to do with it and my husband came up with this idea. Perfect! Its way to heavy to hang on the wall and made me too nervous.  $7 is a great deal for this beauty. Thanks Deb!

Whats next? More furniture of course! Stay tuned....